BassMuse
A cross-DAW MIDI-effect plugin that plays bass in the style of the greats — locked to your transport.
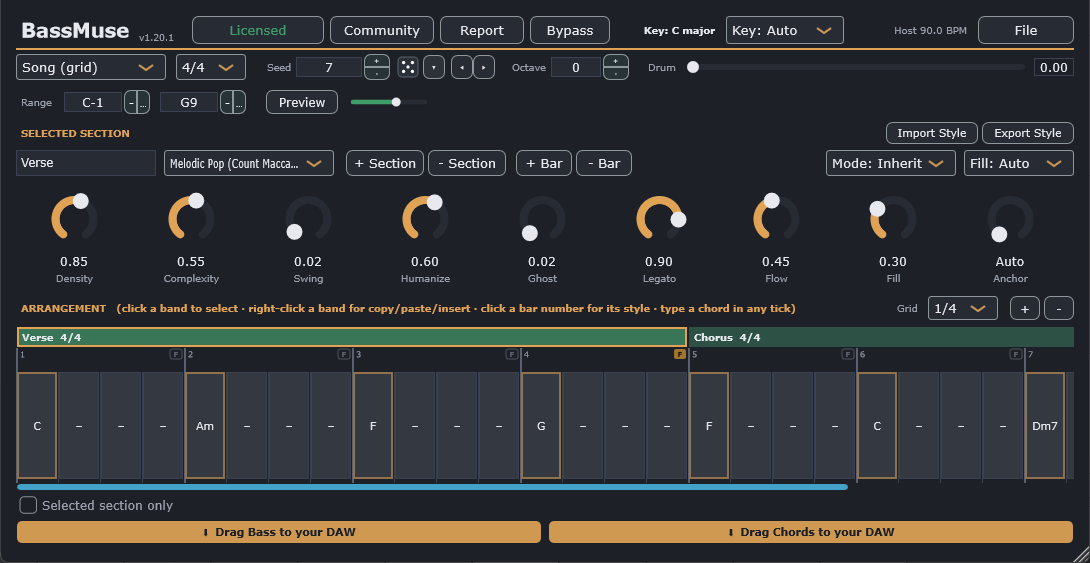
User Manual · Version 1.20.1
If you've never used a plugin quite like this one, that's fine — BassMuse is a fairly new kind of tool, and this manual is built to get you playing before it gets you reading theory. Chapter 1 tells you what BassMuse actually is and how it fits into a session; Chapter 4 gets sound out of it in three steps. Everything after that is there for when you want more control, or when something isn't behaving the way you expect.
You don't need to read this front to back. Treat it the way you'd treat a good reference book: jump to the chapter that answers the question you actually have right now, and trust that the cross-references will catch you if you need something from earlier.
BassMuse is a MIDI-effect plugin. If that phrase is new to you, here's the short version: it doesn't make a sound by itself. Instead, it reads MIDI in and writes MIDI out, the same way a session player reads a chord chart and plays a part — except the part BassMuse writes goes straight into whatever instrument you point it at. In every host, on every platform, the job is the same:
chords → BassMuse → an instrument
You give BassMuse a chord progression, pick a style, and it generates a musical part that stays locked to your host's tempo and transport. Press play in your DAW, and BassMuse plays with you — stop, and it stops. There's no syncing to do, because it's already listening to the same clock your DAW is.
I think that's the detail worth sitting with for a second: you're not recording a performance and hoping it lines up. BassMuse generates its part in real time against your transport, every time, so it's always in time by construction.
BassMuse can build a part from a progression you write ahead of time, or from chords you feed it as you play. Both roads lead to the same engine underneath.
"Deterministic" is a five-dollar word for a simple promise: the same inputs always give you the same output. Feed BassMuse the same progression, the same style, and the same Seed value, and you'll get exactly the same notes back, every single time.
This matters more than it might sound like it should. A generated part is only useful if you can trust it to stay put — you don't want it quietly changing on you between sessions, or between an early mix and the final bounce. Because BassMuse is deterministic, a part you like is a part you can keep. And when you want something different, you don't need to fight the engine for it — you just nudge the Seed control and roll a fresh variation on demand.
BassMuse comes with a fairly complete toolkit for building a part and getting it out into your session:
That's the whole shape of the plugin in outline. The rest of this manual walks through each piece in turn, starting with getting BassMuse installed and into your DAW.
Installing BassMuse is a normal plugin install — nothing about it is unusual, and you'll be done in a couple of minutes. The one thing worth knowing going in is where it lands: BassMuse installs into the shared system folder every DAW scans for plugins, not into some private folder of its own. That's what makes "install once, use in any DAW" actually true.
I'll walk through Windows and macOS separately, since the installers — and the folders they use — are different on each.
BassMuse-1.20.1-Setup.exe.C:\Program Files\Common Files\VST3\BassMuse.vst3 — the shared folder every Windows DAW scans on startup — along with the user manual, a couple of reference documents, and a folder of example songs and styles.Notice that step 3 doesn't ask you where to install anything. That's deliberate: BassMuse always goes to the one folder every DAW already knows to look in, so there's no path to get wrong and no separate step to point your DAW at it afterward.
Program Files and a folder shared by every application on the system. Windows will prompt you for that automatically — you don't need to do anything differently.BassMuse.vst3 folder straight into C:\Program Files\Common Files\VST3, then reopen your DAW and rescan. It's the same plugin, just without the installer wrapper.BassMuse-1.20.1.pkg.- VST3 → /Library/Audio/Plug-Ins/VST3/BassMuse.vst3 - Audio Unit → /Library/Audio/Plug-Ins/Components/BassMuse.component
Here's the one Mac-specific decision you need to make: which format to use. Logic Pro and UAD Luna only load the Audio Unit — there's no VST3 option in either host — so the AU build is the one that matters there. Most other Mac DAWs are happy with either format, and it won't matter which one loads.
BassMuse's Windows and macOS builds are code-signed — Windows Authenticode on the .exe and the plugin itself, Apple Developer ID plus notarization on the Mac side — so you shouldn't need to fight your way past an "unknown publisher" block to install it.
That said, don't be surprised if a brand-new release still draws a raised eyebrow from Windows SmartScreen or an antivirus scanner the first few days after it ships. That's a reputation check, not a signature check: SmartScreen and some antivirus engines flag any installer from a small, unfamiliar publisher until enough people have safely run it, signed or not. If you see a warning like that, it should clear on its own within a few days as the new release builds up a track record — it isn't a sign anything's actually wrong with the file.
| Format | Hosts |
|---|---|
| VST3 | Reaper, Bitwig, Cubase, Studio One, FL Studio, Cakewalk Sonar, Mixbus, Digital Performer, Fender Studio Pro |
| Audio Unit | Logic Pro, UAD Luna, and other AU hosts (macOS) |
| CLAP | Reaper, Bitwig, Studio One, FL Studio, and other CLAP hosts (Windows & macOS) |
| AAX | Not yet — see Chapter 15 for how to use BassMuse in Pro Tools today |
An AAX build for Pro Tools is on the roadmap, but it depends on a separate signing program through Avid that's outside BassMuse's own release process — so there's no date to promise yet. Chapter 15 covers the two ways to use BassMuse in Pro Tools in the meantime.
The installer doesn't just place the plugin — it also drops a folder of example songs and styles alongside the documentation, so you've got something to load and pull apart on your very first session.
.bmstyle, .bmsong, .bmbundle) are for, and how to share a song with someone who doesn't have your custom styles. For now, just know the examples are there waiting for you once BassMuse is up and running.Let me get this one out of the way early, because it's the first wall a new user tends to hit — usually at the moment they first try to save. BassMuse lets you build a whole arrangement and play it back without entering anything at all. What it holds back until you've activated is getting your work out: saving a song, exporting or dragging out MIDI, and the two account-connected buttons, Community and Report. So you can explore freely, but the day you want to keep something, this is the step waiting for you.
Here's the good news up front: activation is a one-time paste of a short code, and there's a free 30-day trial that unlocks everything — it isn't a crippled preview. A trial license and a paid license behave identically while they're valid; the only difference is that the trial has a clock on it.
It's worth being precise about where the line falls, because it's narrower than people expect:
Everything happens on one small screen, and you reach it from the License button on BassMuse's top row. That same button is also your status light, so it's worth knowing what it's telling you at a glance:

Figure 3.1 The License button doubles as your status light. From left: Activate (red — nothing entered yet), Trial: Nd (amber — a trial is running, days left shown), Trial ended (red — your 30 days are up), and Licensed (green — a paid license is active).
SBP-XXXX-XXXX-XXXX-XXXX. The same field takes a trial code and a purchase code; BassMuse works out which one you've given it.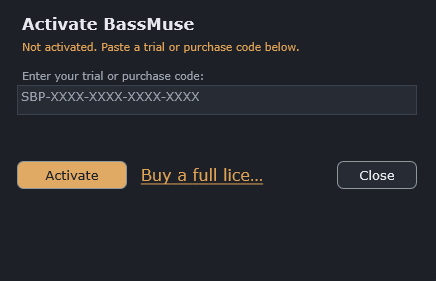
Figure 3.2 The activation screen. Paste your SBP-… code into the field and click Activate; the Buy a full license link goes straight to the store if you don't have a code yet. Once you're activated, a Deactivate button appears here too, for releasing this machine.
Notice that you only do this once per machine. After it succeeds BassMuse remembers the license and works offline from then on — a paid license quietly re-checks with the store about once a month when you happen to be online, but you never have to think about it.
A trial code comes from the free-trial sign-up on the BassMuse website; a purchase code arrives when you buy. Either way it's the same SBP-… format, and either way you enter it the same way. If you don't have one yet, the activation screen has a Buy link that takes you straight to the store.
One license covers three machines at a time — a studio desktop, a laptop, and one more. If you try to activate on a fourth, BassMuse tells you the limit's reached and asks you to free one up first.
Here's the fastest way to hear BassMuse actually play — using Song mode, which is where you'll do most of your work anyway. Three steps, and you don't even need a progression ready to go, for a reason I'll explain in step 2.
Notice that nothing about this depends on you building anything first. Step 2 exists so you know your own progression is one click away, not because BassMuse needs you to fill in a blank page before it'll make a sound.
Set Source to Follow MIDI and send chords into BassMuse's MIDI input — from a MIDI clip, a keyboard, or your DAW's chord track. BassMuse plays under whatever chords it hears, in real time, no arrangement required.
The rest of this manual takes BassMuse apart control by control. This chapter does the opposite: it walks one real song from open to finished, so you can see how the pieces fit together before you meet them one at a time. We'll load an arrangement that ships with BassMuse, listen to it, take it apart, change it, and pull the result into your DAW — the whole loop, start to end.
There's a quiet advantage in that phrase "an arrangement that ships with BassMuse": because the engine is deterministic, the example plays the same notes on your machine as it does on mine. So when I say what you'll hear, you actually will — I'm not describing a possibility, I'm describing your screen. Get your DAW open with BassMuse on an instrument track (Chapter 4 has the three-step version if you need it), and let's go.
BassMuse's installer drops a folder of ready-made songs and styles next to the plugin. We'll open one of the songs.
C:\Program Files\BassMuse\Examples\Songs (on macOS, /Library/Application Support/BassMuse/Examples/Songs) and open Example-VerseChorus.bmsong.BassMuse plays the whole arrangement through your instrument, locked to your transport. You'll hear a bass line move through three sections, then loop. Let it run a couple of times; the next steps are about understanding what you just heard.
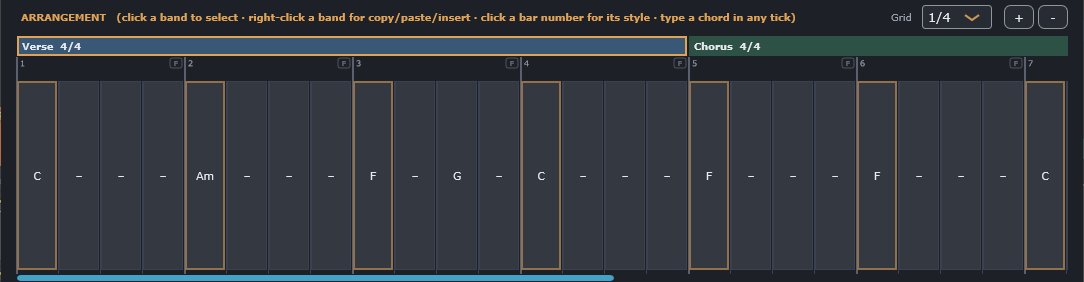
Figure 5.1 Example-VerseChorus loaded — the Verse rolling into the Chorus, each bar's chord sitting in the grid. (The 3/4 Bridge is just off-screen to the right.)
Everything you're hearing is laid out in the Arrangement grid. Along the top are three section bands, each a labeled block: Verse, Chorus, and Bridge. A section is simply a run of bars that share a meter and a style; click a band to select it, and its settings fill the row above the grid.
Here's what's in each one:
C, Am, then F moving to G halfway through the third bar, and back to C.F, F, C, G.Am moving to Dm7 partway through the first bar, then G7, Cmaj7, E7. Notice the meter changed and the line followed it — you didn't have to do a thing.Under each band is the bar grid: numbered cells, one row per bar, where the chords live. The third Verse bar is the clearest example of the grid's reach — F@0 G@2 means "the first chord from beat 1, the second from beat 3", and you can see both chords sitting in the one bar at different points.
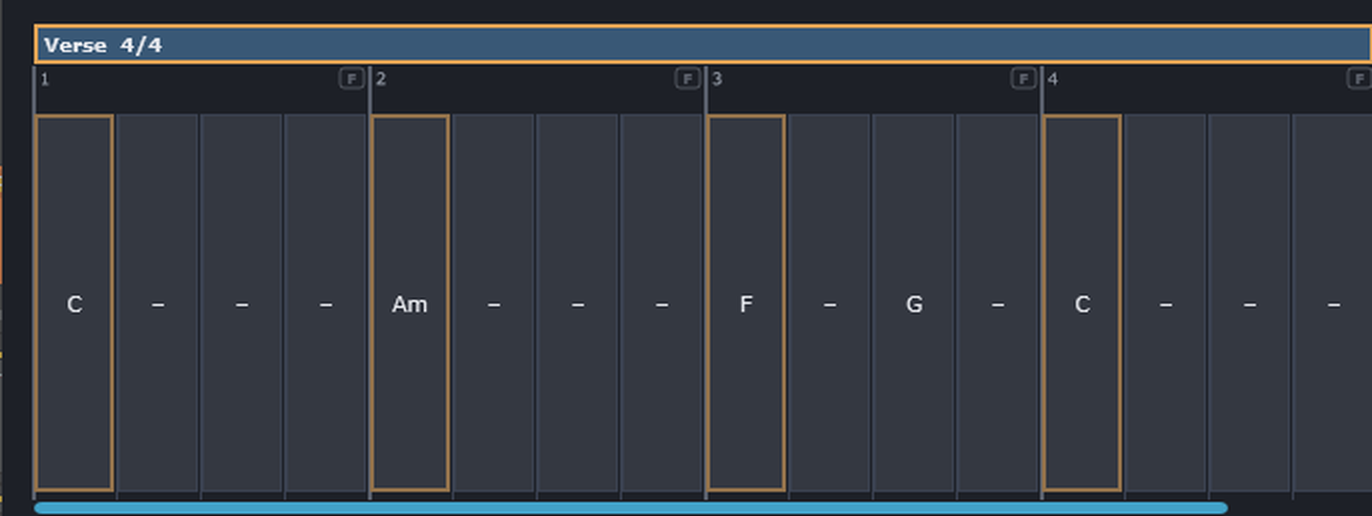
Figure 5.2 The Verse's four bars. Bar 3 is the two-chord bar — F@0 G@2 — the first chord from beat 1, the second from beat 3.
A song you can't change isn't much of a starting point, so let's change something and hear it. We'll swap a chord using the chord selector rather than typing — the visual picker you'll use for every chord you ever enter (Chapter 9 covers it in full).
F. The chord selector opens with that chord already loaded.Dm — and click Apply. Notice how the grid cell updates and the band redraws.That last part is the deterministic engine doing you a favor: you changed one chord, and only that chord's neighborhood changed. Nudge the Seed control at the top if you want a fresh take on the same chords; set it back and the old take returns, note for note.
You've got something you like; now pull it into your session as real MIDI. This is where a trial or purchase code earns its keep, because drag-out is one of the things activation unlocks (Chapter 3).
That's the finished loop: an idea, played, shaped, and printed to a clip. (Figure 12.1, in the drag-out chapter, shows the two strips.) From here Chapter 12 covers drag-out in full — including dragging just the chords, or just the selected section.
Last thing: save your version so it's yours. Click File ▸ Save Song, give it a name, and BassMuse writes a .bmsong file — a small, plain-text arrangement you can reopen, back up, or hand to someone else (Chapter 13). Save it somewhere of your own rather than back into the read-only Examples folder, so the original stays put for next time.
And that's a whole first song. You loaded a real arrangement, understood its sections and chords, changed one, dragged the result into your DAW, and saved your own copy. Every control you touched has a chapter of its own ahead — but you've already seen how they add up.
The editor is one window, and everything in it is organized top to bottom by scope: global controls that apply to the whole song, then the settings for whichever section you've got selected, then the arrangement grid itself. Once you know that ordering, the window stops looking crowded and starts looking like exactly three questions, answered in order: what's the song doing, what's this section doing, and what are its chords.
These apply to the whole song, no matter which section is selected.
| Control | What it does |
|---|---|
| Source | Song (grid) · Follow MIDI · Demo progression (Chapter 7) |
| Key | Key: Auto (detected from your chords) or force a major/minor key |
| Host BPM | Read-out of the host tempo BassMuse is locked to |
| License / Activate | Shows your activation status — trial days remaining, or Activate if you haven't yet — and opens the activation screen |
| File | Save / Load Song, Save / Load Bundle, Build arrangement, Clear Song, Follow section on play, and a handful of smaller settings covered in later chapters (Chapters 8, 10, 12, 13) |
| Community | Browse and share styles, songs and bundles with other owners — requires activation |
| Report | Send a bug, idea or question to the feedback board (Chapter 16) |
| Bypass | Silences BassMuse's output while it stays in the chain — a "mute" for the plugin. Saved with the song |
| Seed | Re-rolls the part; same seed = same notes |
| Octave | Global transpose in octaves |
| Range (Low / High) | Folds every generated note by octaves to stay inside your instrument's playable window |
| Drum | Drum-lock amount, 0→1 (Chapter 11) |
The File menu is worth a callout of its own: it's the one control on this row that hides more than it shows. Beyond the items above, it's also where you turn on live chord capture, learn a variation-trigger note, assign a MIDI controller to the Drum knob, and a few other settings that each get their own explanation where they're actually used.
Every section — Verse, Chorus, or whatever you name it — carries its own settings, so a 4/4 Motown verse and a 3/4 waltz chorus can genuinely be different pieces of music living in the same song.
| Control | What it does |
|---|---|
| Name | Label for the section (Verse, Chorus, …) |
| Meter | Time signature for this section (4/4, 3/4, 5/4, …) |
| Style | Which style plays this section |
| Mode | The scale mode for this section's connective notes — Ionian, Dorian, Phrygian, Lydian, Mixolydian, Aeolian or Locrian, or Inherit to just follow the song key |
The feel knobs are their own small family, and picking a style loads a full set of defaults for them — you're always adjusting from a sensible starting point, never a blank slate.
| Knob | Effect |
|---|---|
| Density | How busy the part is — more notes vs. more space |
| Complexity | Chromaticism, walking and approach notes |
| Swing | Delays the off-beat for a shuffle feel |
| Humanize | Loosens timing and velocity so it feels played, not typed |
| Ghost | How often notes drop to quiet ghost notes |
| Legato | Note length within the beat — from short and detached to smooth and connected |
| Flow | Connectedness — ties each note toward the next one across empty beats instead of leaving gaps |
| Fill | Transition fills — a short directional run into the end of the section |
| Anchor | Pins this section's chord downbeats on the root, independent of Complexity — from loosest to fully root-locked |
1/4, 1/8, or 1/16 — so you can place more than one chord per bar when a passage needs it.A playhead sweeps the grid during playback and auto-scrolls to keep up, and the selected section follows it — so whichever section the song is currently playing, that section's knobs and chords are the ones on screen. It's considerate about it, too: the playhead steps aside while you're actively editing — holding a knob, typing the section name, or browsing the style or meter list — and for about a second after any change, so it never yanks the selection out from under you mid-tweak. It's on by default; turn it off with File → Follow section on play if you'd rather the selection stay put.
.bmstyle files (Chapter 13)..mid file (Chapter 12).The Source dropdown answers one question: where should BassMuse get its chords from? Think of it as choosing between three different musicians' jobs — reading a chart you wrote out in advance, following a singer by ear in real time, or just noodling along to a practice loop. All three play through the exact same engine underneath; they just differ in where the chords come from.
There are three settings, and picking the right one matters because two of them quietly change what the rest of the window looks like.
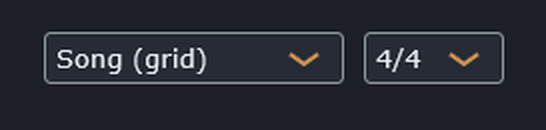
Figure 7.1 The Source dropdown — here on Song (grid) — with the time-signature picker beside it.
This is the mode you'll use to actually write a part into a song. BassMuse plays the arrangement you built in the grid — every section, in order, with each section's own meter, style, feel, and chords — locked to your host's transport from the first bar to the last.
Song mode is also the only one of the three that plays through the whole arrangement. Follow MIDI and Demo progression, by contrast, both loop — which is exactly why they're built for auditioning, not for a finished take.
Follow MIDI turns BassMuse into a real-time accompanist instead of an arranger. It ignores the grid completely and instead watches the notes arriving at its own MIDI input, live.
Here's the mechanism, since it explains a lot about how the mode behaves:
Because there's no arrangement involved, the grid hides itself in this mode — there's nothing in it to look at. The window also shrinks down to a compact height, and the section panel below relabels itself FOLLOW STYLE (generated on each chord you hold), which is BassMuse telling you plainly what it's doing.
Demo progression is the fastest way to answer "what does this style actually sound like?" without building anything first. BassMuse loops a built-in eight-chord progression through whichever style is currently selected, so you can flip through styles and hear each one immediately.
Like Follow MIDI, it loops indefinitely rather than playing once — and it hides the arrangement grid and shrinks the window the same way, since there's nothing to arrange here either.
Both Follow MIDI and Demo progression need a style and a feel to play with, and neither one has its own arrangement to pull those from. So both borrow them from the same place.
A song, to BassMuse, is a list of sections — Verse, Chorus, Bridge, whatever names you give them. Each section carries its own time signature, style, feel, and bars, so a 4/4 Motown verse can sit right next to a 3/4 prog bridge in a completely different style. This chapter walks through building that list up: adding and arranging sections, filling them with chords, and the handful of controls — key, seed, range, and the live variation trigger — that shape the song as a whole.
Everything starts with the row of section bands across the top of the arrangement grid.
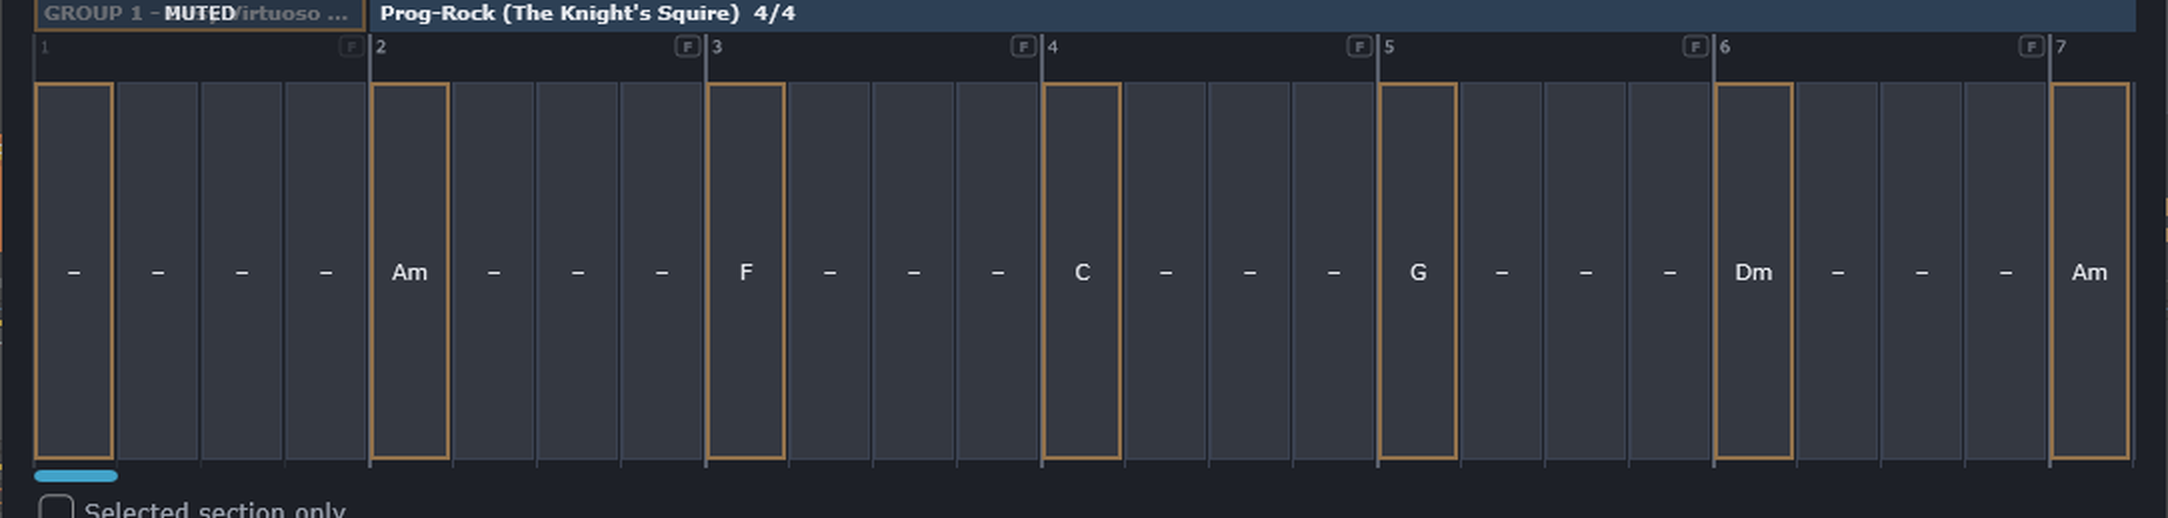
Figure 8.1 A section band and the bar grid beneath it. The band names the section, its style and meter; each numbered cell below is one bar, and clicking a cell opens the chord selector to set that bar's chord.
Building a multi-section arrangement one + Section click at a time works, but it's not the fastest way to get a whole song's skeleton down. File → Build arrangement… does it in one step.
Name:Bars tokens, separated by spaces or commas — for example: Verse:8 Prechorus:4 Chorus:8 Turn:4 Verse:8 Chorus:8. Or skip typing and click a template instead: Pop, Verse/Chorus, AABA, or 12-bar blues.
Figure 8.2 The quick song builder. Type a Name:Bars structure or click a template, then Append or Replace.
BassMuse creates every named section with the bar count you gave it (clamped to a sane 1–64 bars if you type something wild), and each new section inherits the meter, style, and feel of whichever section was selected when you opened the builder — so the sections you build already carry the groove you'd already dialed in, rather than starting from scratch. Type the same name twice and BassMuse numbers them for you automatically (Verse 1, Verse 2), so you never end up with two sections both just called "Verse."
.bmsong file before Replace clears it, so a structure experiment can never cost you the song you already had.Right-click any section band for the full set of section-level actions:
4/4 3/4 2/4 5/4 6/4 7/4 2/2 3/2 6/8 9/8 12/8 7/8 5/8. The odd-eighth meters (7/8, 5/8) now play at their true length — 7/8 is 3½ beats, not rounded up to 4 — so loops, the playhead, and MIDI export all stay in sync.Keyboard shortcuts do the same jobs when the editor has focus: Ctrl/Cmd+C copy, Ctrl/Cmd+X cut, Ctrl/Cmd+V paste after, Ctrl/Cmd+D duplicate.
Every change you make to the arrangement can be undone with Ctrl/Cmd+Z and redone with Ctrl/Cmd+Shift+Z (on Windows, Ctrl+Y redoes too) — adding, deleting, reordering, renaming or duplicating sections; editing chords; changing a section's meter, key, mode, style or feel knobs; per-bar fills and mutes; and dropping a MIDI clip in. Undo and Redo are on the File menu as well, grayed out when there's nothing to undo. Dragging a knob counts as a single step — one undo takes the whole move back, not one tiny nudge at a time. The history is per session: it starts fresh when you load or clear a song, and it isn't saved with the project.
Add bars to the selected section with + Bar. To put a chord in a bar, click its chord cell — that opens the chord selector (Chapter 9), which is how every chord gets entered. BassMuse understands a wide vocabulary once you're in the selector or reading a chord back:
C, Am, G7, Cmaj7, Dm7, F#m7b59, 11, 13 (e.g. C13, Am11)C/E, G/B — the part honors the slash noteSet Grid to 1/8 or 1/16 and you can place chords on sub-beats instead of just the downbeat. Each chord holds until the next one comes along; an empty cell simply holds whatever chord came before it. If you're reading or hand-editing a song's plain-text file, a bar with more than one chord is written as F@0 G@2 (F on beat 1, G on beat 3) or Am@0 Dm7@1.5 (a change on the "and of 2").
By default, every bar plays in its section's style. Sometimes you want one passage to take a different voice while the rest of the section keeps its groove — a bridge that hands off to a busier player for four bars, say. You can override the style for a single bar, or even a single chord. An overridden bar or chord takes on that style's own feel, so it genuinely sounds like the player you picked — and you can fine-tune that bar from there (see Per-bar feel & variation below).
Overrides are saved with the song and travel in shared .bmsong files. If whoever you send it to doesn't have that exact style installed, the bar just falls back to the section's style rather than breaking anything.
A style override changes who plays a bar; you can also fine-tune how that bar plays, one bar at a time. Click a bar number and choose Edit this bar's feel from the same combined menu. The feel knobs above the grid switch to that single bar: turn any of them and it's pinned for that bar alone. The knob's label lights up to show it's overridden, and the bar gets a small accent underline along the bottom of its lane, so your tweaks read at a glance across the whole arrangement. A knob you haven't touched shows the value the bar inherits, so you always see what it will actually play.
What it inherits depends on the bar. If the bar carries a style override, its feel starts from that style's own settings — the same reason an override bar sounds like the player you gave it — so you're tuning the override, not the section. A plain bar inherits the section's feel. Either way, a knob you turn wins for that bar only.
You can also re-roll a single bar. While a bar is focused, the variation steppers (the small ‹ › arrows by the Seed, top of the window) step that bar's own generation instead of the section's — nudge forward for a fresh take of just that bar, and step back to walk through the takes you've already seen and land on the one you liked. It's the same idea as the section variation steppers, scoped to the one bar, and it's saved with the song.
Editing a bar's feel is an idle-time activity: press Play and the controls return to the live view, following the arrangement as usual. To stop editing a bar without playing, click any section band, or choose Edit this bar's feel again to toggle it off. Reset this bar's feel on the same menu clears a bar's overrides and returns it to what it inherits.

Figure 8.3 Editing one bar's feel — the feel knobs retarget to the focused bar, an overridden knob is lit, and the bar carries the accent underline that marks a per-bar override.
Sometimes the part should lay out — a rest bar, or a whole section that drops before a big return. You can silence either without deleting anything:
Muting only ever affects output. The section or bar keeps its exact place in time — loop length and playhead are unaffected — and its chords, style, and feel are all kept intact, so un-muting brings back exactly what was there. A chord that was already holding when it runs into a muted bar simply resumes on the other side of it, and a note ringing into the drop gets trimmed cleanly rather than cutting off ugly. Mute is saved with the song, and both live playback and Drag MIDI to your DAW respect it. (Silencing an individual beat, rather than a whole bar, is planned for a later release.)
Leave Key on Auto and BassMuse works out the key from your chords, shown as something like "Key: C major." Override it if you want to pin a specific tonal center — approach notes and walking lines respect whichever key is active, auto-detected or not.
All three are global to the whole song, not per-section.
The Seed control re-rolls the whole song between takes — great for finding a part you like, but not something you'd want to touch mid-performance. The variation trigger does the same kind of re-roll live, per section, while the song is actually playing: a MIDI note you choose re-rolls the pattern for whichever section the playhead is currently in, and everything else in the arrangement is left untouched. It's built for performing — think of it as a "variation pad" you can tap between phrases.
Set it up under File → Variation trigger:
During playback, each tap steps to the next variation, and the new pattern always lands cleanly on the next downbeat — never mid-bar. It's deterministic: the same sequence of taps reproduces the same part every time, and your underlying song seed is never touched by any of this.
You'll see it happen, too. The section's band flashes the moment a variation fires, and stays marked with a small ▲N badge for as long as it's sitting on a variation — N counts how many times you've re-rolled it, so a glance at the arrangement tells you which sections are on their base seed and which are running a variation. Found one you love? File → Variation trigger → Bake current variations into song folds it permanently into the saved song — it becomes that section's actual seed, survives edits and reloads, and clears the badge since there's no longer a "variation" to distinguish it from. This all works in Song (grid) mode, since that's the mode where BassMuse owns the sections in the first place.
The chord selector is a small window that lets you build a chord by clicking instead of spelling it out. It's the same idea as a chord chart taped to a music stand — you look at the shape you want, you point at it, and you move on. The difference is that this chart also shows you the song key, lights up the notes on a keyboard, and writes the finished symbol into your arrangement for you.
This matters because BassMuse builds its bass line from the chord symbols in the grid, and a symbol it can't read is a symbol it quietly ignores. The selector never hands you an unreadable chord. Every chord you build here is one BassMuse can play.
You'll spend more time in this window than almost any other, so it's worth ten minutes learning what each part does. Let's open it first.
The selector belongs to the arrangement grid, so you reach it by clicking the cell you want to change.
Your screen should now look like the one shown in Figure 9.1.
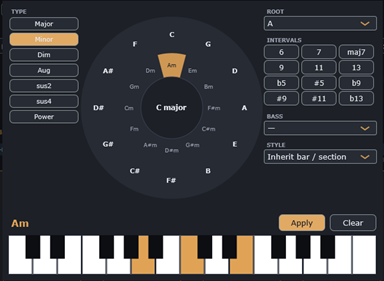
Figure 9.1 The chord selector. The wheel's center reads "C major", the Am segment on the inner ring is filled, and the preview at the bottom left confirms the chord as Am.
If the cell already had a chord in it, the selector opens with that chord loaded: the root, the type and the slash bass are all set for you. An empty cell shows a small dash, and clicking it opens the selector on C major — the starting point the window uses when it has nothing to go on.
The selector is a Song (grid) feature. In Follow MIDI mode there's no arrangement to edit, so the grid — and with it the selector — isn't on screen at all.
The window is laid out in four regions, and once you can name them the rest of this chapter is easy going:
Everything updates live. Click anything at all and the preview text, the highlighted keys and the highlighted wheel segment redraw together, so you're never guessing what you're about to write into the song.
The circle of fifths is a way of arranging the twelve notes so that neighbors sound related. Going clockwise from C you get G, D, A and so on — each one a fifth up from the last, and each one a close musical relative of the one before it. Songwriters have leaned on this layout for a couple of centuries, because chords that sit near each other on the circle tend to sound good near each other in a progression.
BassMuse draws it as two rings with the song key in the middle:
- when BassMuse hasn't got enough chords in the song to work a key out yet.To use it, click a segment:
Figure 9.1, back in the previous section, shows step 2 in progress. The song is in C major, and the Am segment on the inner ring has been clicked: it fills with the accent color, TYPE switches to Minor, and the preview reads Am. Notice that Am sits in the same wedge as C on the outer ring — that's the relative minor, the closest possible neighbor to the song's own key.
The center isn't clickable, and neither is the area outside the wheel — clicks land only on the two rings. So don't be afraid to explore; the worst a stray click does is nothing at all.
If you'd rather not use the wheel, the ROOT dropdown beside it does the same job. It lists all twelve notes, and it always agrees with the wheel — pick from one and the other follows.
The center readout comes from the Key control on the main window. Leave that on Key: Auto and BassMuse works the key out from every chord in the song; set it explicitly and the wheel's center shows your choice instead.
The TYPE buttons set the basic quality of the chord — the part that decides whether it sounds bright, dark or unsettled. There are seven, and the selected one is highlighted in the accent color.
| Button | What it writes | What it sounds like |
|---|---|---|
| Major | C | The plain, bright triad |
| Minor | Cm | The darker triad |
| Dim | Cdim | Tense and unresolved — a passing chord |
| Aug | Caug | Raised fifth; restless |
| sus2 | Csus2 | Open and unresolved, with the third replaced |
| sus4 | Csus4 | The classic suspension that wants to fall |
| Power | C5 | Root and fifth only; neither major nor minor |
Only one type can be active at a time, which is exactly right — a chord is either major or minor, not both. Click a different button and the previous one releases.
Two of these deserve a word of honesty before you build a song around them.
The INTERVALS buttons add the notes that turn a plain triad into something with character. A C major triad is three notes; add the seventh and you get Cmaj7, which is the same chord wearing a nicer jacket. These are the tones players call extensions (the 6, 7, 9, 11 and 13) and alterations (the flattened and sharpened ones).
There are twelve buttons in a three-column grid:
They're toggles rather than a single choice. Click one to switch it on, click it again to switch it off, and the ones that are on stay highlighted. Switch on as many as you like.
Here's the part that surprises people, so I want to be straight about it. The chord symbol keeps only one extension, even when several buttons are lit. BassMuse picks it in this order and uses the first one it finds: maj7, then 13, then 11, then 9, then 7, then 6. So if you turn on both 7 and 9, the preview reads C9, not C79 — which is right, because in real chord notation a 9th chord already contains the 7th.
The alterations follow their own rule, and it's worth knowing why. An alteration only reaches the symbol when the chord already has a seventh or higher in it — that is, when maj7, 13, 11, 9 or 7 is switched on. Click b9 on a plain major triad and the preview won't change, because "C with a flat ninth and no seventh" isn't a chord anyone writes.
C.C7b9 — the alteration finally had somewhere to attach itself.C, taking the alteration with it.CmMaj7). Selecting Minor and maj7 together gives you plain Cm, because the maj7 marker is ignored when the type is minor.The BASS dropdown puts a different note underneath the chord — what's written as C/E and read aloud as "C over E". That bottom note is what your ear hears as the foundation, so changing it changes the whole feel of the bar without changing the harmony one bit. It's the standard way to write an inversion, and it's how you get a bass line that walks down while the chords stay put.
The list starts with an em dash (—), which means "no slash bass, just play the root," followed by the twelve notes. Pick a note and the preview appends it after a slash; pick the dash to take it away again.
BassMuse honours the slash note in the generated part, which is the whole point. A C/E tells the bassist to sit on E, not C.
C, G/B, Am, Am/G across four bars. The bass walks C–B–A–G under chords that barely move, and it's one of the most-used moves in popular music.The keyboard along the bottom shows the chord you've built, highlighted across two octaves. BassMuse voices the chord once — it doesn't light up every octave — and shifts the whole voicing to sit near the middle of the keyboard, so the shape you see is roughly the shape a player's hand would make.
Use it as a sanity check rather than a score. Glance at it before you click Apply and you'll catch the wrong-root and wrong-quality mistakes that are otherwise invisible in a chord symbol.
The preview does have limits, and knowing them saves confusion later:
C7b9 lights up as a plain C7 with the perfect fifth in place, so the flattened ninth won't appear even though the symbol carries it.The STYLE dropdown is the odd one out in this window: it doesn't change the chord at all. It changes who plays it. Every chord normally inherits its style from its bar, and the bar from its section — but sometimes you want one chord in a turnaround to come from a different player entirely.
Leave it on Inherit bar / section and everything behaves normally. Pick a style from the list and that one chord plays in that style, overruling both the bar and the section. The section's feel knobs — density, swing, ghost, legato and the rest — still apply; only the player changes.
You'll see the override on the grid straight away. The cell picks up a colored wash and a bold frame in the style's color, so one scan of the arrangement tells you which chords have been singled out.
You've got three ways to leave the selector, and they do genuinely different things.
Get into the habit of using the dimmed backdrop when you're just browsing. It's the only exit that changes nothing, and it saves you from talking yourself into a chord you were only auditioning.
One cell holds one chord, so the number of cells per bar decides how finely you can place changes. That's the job of the Grid dropdown beside the arrangement controls: 1/4 gives you one cell per beat, 1/8 gives you two, and 1/16 gives you four.
To put a chord on the "and" of beat 2, set Grid to 1/8 first, then click the cell you want. Each chord holds until the next one, so you only need to place a chord where something actually changes.
Reopening a chord doesn't always bring back everything you put into it. BassMuse stores the chord as a symbol, and when the selector reads that symbol back it restores the root, the base quality and the slash bass — but not the extensions and alterations.
Here's what that means in practice. Say you build C13 and apply it. Click that cell again and the selector opens showing Major with the 7 button lit, and the preview reads C7. The 13 is still in your song, but it isn't in the window any more. Click Apply at that point and you'll overwrite C13 with C7 without meaning to.
The same thing happens with Aug and sus2, which come back as Major and sus4 respectively. There's no way around this from inside the window, so the habit to build is a simple one: if you're only looking, click the backdrop.
I don't want to make this sound worse than it is. It only bites on the richer chords, it's completely predictable once you know about it, and the preview always tells you exactly what Apply is about to write. Read the preview line, and you'll never be caught out.
A style is BassMuse's model of a player's characteristics — their register, their rhythmic feel, their harmonic vocabulary, and how they articulate a note. It's not a transcription of anyone real; think of it more like a character an actor plays than an impersonation of a specific person. That's deliberate: it means every style is legally BassMuse's own, and it also means you're picking a sound, not a copy of a recording.
Eighteen bassist styles are built in:
| Style (dropdown label) | Character |
|---|---|
| Motown (Son of Jammer) | Melodic, syncopated Motown pocket |
| Funk (Flee's Bag) | Slap-flavored, punchy funk |
| Fusion (Pastor Jacob) | Fretless 16ths, upper register, chordal |
| Neo-Soul (Noir Pino) | Deep, laid-back, spacious |
| Prog-Rock (The Knight's Squire) | Driving, melodic prog |
| Funk-Metal (Pool of Play Doh) | Aggressive, playful, tapping feel |
| Hard-Rock (Lemmings Rock) | Overdriven, relentless eighths |
| Prog (Lee Geds It) | Busy, high-register, sixteenth runs |
| Blues-Rock (Jake The Brewster) | Powerful blues-rock drive |
| Lead-Bass (Enter The Wistler) | Galloping, lead-like lines |
| Melodic Pop (Count Macca deBass) | Tuneful, warm countermelody |
| Pocket Blues (MacVine) | Solid, root-anchored, tasteful |
| Jazz (Chas Magnum) | Aggressive post-bop upright walking, strong swing |
| Slap Virtuoso (Woot-Woot!) | Double-thumb slap, ghosts, full-neck range |
| P-Funk (Funky Boots) | Deep space-funk on "the One", spacious, octave-funk |
| Classic Rock (Whole Lotta Bass) | Melodic riff-driven rock, bluesy walking, tasteful fills |
| Sustained (Long Shadow) | Held, sustained tones — sparse and root-anchored; showcases the Flow knob |
| Reggae (One-Drop) | Deep, sparse dub bass behind the beat — held and rounded via Flow |
Picking a style loads a full set of defaults into the feel knobs, so you always start from a sensible place — a Jazz style starts swung and walking, a Synth-Pop style starts stiff and metronomic. From there, the knobs are yours to bend. They're per-section, so a Verse and a Chorus can breathe completely differently even when they share a style.

Figure 10.1 The feel knobs, showing the values the selected style loaded. Every knob is per-section; the table below is what each one does.
| Knob | Range | Effect |
|---|---|---|
| Density | 0–1.5 | How busy the part is — more notes vs. more space |
| Complexity | 0–1 | Chromaticism, walking, and approach notes |
| Swing | 0–0.5 | Delays the off-beat for a shuffle feel |
| Humanize | 0–1 | Loosens timing and velocity so it feels played, not typed |
| Ghost | 0–1 | How often notes drop to quiet ghost notes |
| Legato | 0–1.1 | Note length within the beat — from short and detached to smooth and connected |
| Flow | 0–1 | Connectedness — ties each note toward the next one across empty beats so the part holds and flows instead of leaving gaps. Great for sparse or low-Density parts. Stops at chord changes. Each style sets its own default. |
| Fill | 0–1 | Transition fills — a short directional run into the end of the section, landing on the approach to the next chord. 0 is off; 1 is a busy run up to a full bar long, growing longer and busier as you raise it. By default it only fires on the last bar of each section, so mid-section chord changes stay clean. Each style sets its own default. |
| Anchor | Auto, or 0–1 | Pins the section's chord-tone downbeats onto the root, independent of Complexity — 0 is loosest, 1 is as root-locked as it gets. Auto (the default) lets Complexity drive it the old way; dial in a number to decouple the two, so a busy, complex part can still land hard on the root every downbeat if that's the effect you want. |
That's nine knobs on BassMuse — Anchor is the newest addition, and it isn't (yet) part of PianoMuse's knob row.
The Fill knob's "last bar only" default is a sensible starting point, but sometimes you want a fill somewhere else — bar 4 and bar 8 of an eight-bar verse, say. Click that bar's number, in the row above the chord cells, and look for Fill in the menu that opens:
Each bar shows a small F badge so you can read the whole section's fill map at a glance: a solid amber F — brighter as the amount goes up — means that bar fills, and a faint hollow F means it won't. Per-bar markers are saved with the song and travel in your .bmsong file and DAW session.
A fill can travel up or down on its way into the change. The section-level Fill: Auto / Fill: Up / Fill: Down dropdown, on the section row, sets the direction for the whole section: Auto (the default) always heads toward wherever the run naturally continues from the previous note, Up always ascends, and Down always descends — either way, the run lands on the same approach note just below the next chord's root. You can override a single bar from that bar's own Fill direction submenu, in the same combined bar-number menu described above; choosing Follow style there hands the bar back to the section's setting.
This section-level Fill-direction dropdown is BassMuse-only — PianoMuse doesn't have a section-wide version of it, only the per-bar override described above (which falls back to the same Auto behavior when left on Follow style).
You can also build your own styles as plain-text .bmstyle files — Chapter 13 and the Appendix cover the format.
Kick-lock is what keeps the bass and the kick drum from drifting apart. Real rhythm sections lock onto the kick without thinking about it — the bassist's ear is tracking the drummer the whole time. The Drum slider is BassMuse's version of that same habit: feed it a copy of your kick, and it pulls the bass onsets toward the kick pattern by however much you dial in.
Every bar's downbeat is always kept, no matter what the Drum slider or the Density knob are doing, and a kick hit is never thinned out by Density either — the lock stays tight even in a sparse passage that would otherwise be dropping notes.
BassMuse doesn't react to each kick hit the instant it arrives. Instead, it watches a whole bar of incoming channel-10 kicks, and at the start of the next bar, that's the pattern it locks the bass to for that bar. Then it starts listening fresh for the bar after that.
The practical effect is a one-bar lag, always:
Neither of these is a bug — it's just what "listen to a bar, then play what you heard" means in practice — but it's worth knowing before a sudden drop in your drum track shows up as a sudden drop in the bass too.
BassMuse listens for kick notes on MIDI channel 10 — the General MIDI kick notes 35 and 36 — arriving at its own MIDI input. Send it a copy of your drum MIDI, or just the kick: a send or echo from the drum track, or a duplicated kick clip routed into BassMuse, both work.
Chord-follow deliberately ignores channel 10, which is exactly why this works at all: live chords and kick-lock can share BassMuse's input at the same time. Feed chords on any channel you like and kicks on channel 10, and neither one interferes with the other.
The goal never changes: get GM kick notes (36 / 35) onto MIDI channel 10, arriving wherever BassMuse reads its MIDI input. How you deliver that depends entirely on how your DAW hosts BassMuse (Chapter 14) — either BassMuse sits inside a track's MIDI chain and reads that track's own MIDI, or it's loaded as an instrument fed from a separate track.
BassMuse in the track's MIDI chain — add the kick to that same track's MIDI, on channel 10:
BassMuse as an instrument — these hosts load BassMuse as the instrument, so add a dedicated track that sends it the kick on channel 10:
Pro Tools hosts BassMuse only through a VST→AAX bridge (Chapter 15). Inside the bridge — Blue Cat PatchWork or DDMF Metaplugin — feed a channel-10 kick into the hosted BassMuse alongside the chords. If you're using the MIDI-import workflow instead, do the kick-lock in whichever DAW you use to generate the bass MIDI, then import the finished result into Pro Tools.
Every DAW can accept a MIDI clip dragged onto a track. That's the one thing you can always count on, no matter how unusual your routing is or how a particular host feels about hosting BassMuse as a MIDI effect — which is exactly why BassMuse builds its export and import around plain drag-and-drop instead of anything more elaborate.
The drag strip at the bottom of the window prints your whole arrangement to a standard .mid file the moment you start dragging it. Press and drag it straight onto a track in your DAW — or into a folder, if you just want the file — and let go. You get back a MIDI clip of the part, ready to use.

Figure 12.1 The two drag strips at the bottom of the window — the bass part on the left, the chords on the right. Press and drag either onto a DAW track.
This is the universal fallback. It works in every DAW, with no routing to set up and no plugin-format concerns, and it bounces down perfectly because by the time it hits your track, it's just MIDI — nothing depends on BassMuse being loaded at mixdown time. Reach for it whenever live routing feels like more setup than the moment calls for, or any time you're working in Pro Tools (Chapter 15), where it's one of only two ways in.
Right beside the part strip is a second one that prints the arranger's chords themselves, as sustained block-chord MIDI, instead of the generated part. Drag it onto a piano, pad, or synth track to comp underneath whatever BassMuse is playing. It voices the full chord — extensions and all — as an ascending spread starting around C3, so a dense 11th or 13th chord opens outward instead of clumping into a cluster down low.
By default, that voicing leaves the very bottom out — File → Chord drag: omit low root is on out of the box, on the theory that the generated part already owns the low end and doesn't need company down there. Turn it off and a low root gets added below the voicing to anchor it on its own, useful if you're dragging chords out without a bass part alongside them. Your choice here is saved with the song.
Both drag strips normally export the whole song, but the Selected section only toggle next to them scopes both at once to whichever section you currently have selected — rebased to start at bar 1, so the clip you get is just that section, standing on its own. The strip labels update to show which section you're about to drop, so you're never guessing.
The strips work in reverse too: drag a MIDI clip out of your DAW and drop it onto the arranger, and BassMuse reads the harmony out of it and writes a chord progression into the grid for you. A few things make this more reliable than it might sound:
When you drop the clip, a menu asks where the chords should land:
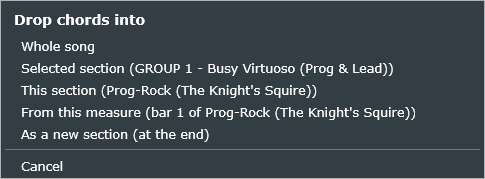
Figure 12.2 The drop-target menu. Each option names the section it would affect, so you can see exactly where the chords will go before you commit.
If you picked a section or a from-this-measure target and the clip is longer than the room it has, BassMuse asks — by name, with the real numbers on both sides — something like "The dropped chords span 12 bars, but this section holds 8. Clip the extra bars, or extend this section to fit?", with Clip to fit and Extend this section as your two options. Whole Song and As A New Section never need to ask — they simply grow to fit. And no matter which target you pick, if it would overwrite chords that are already there, BassMuse asks you to confirm the replacement first, naming exactly what's about to be replaced ("this section," "the whole song," or "this measure onward").
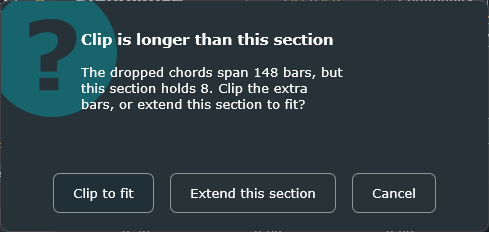
Figure 12.3 The fit prompt — shown only when the clip has more bars than a bounded target. Clip the extra bars off, or grow the section to hold them.
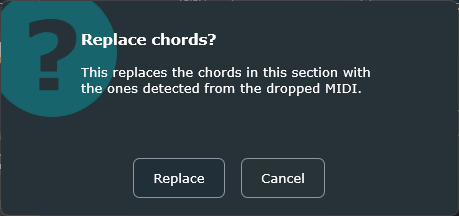
Figure 12.4 The replace confirmation — shown only when the target already holds chords, so a drop never silently overwrites work you'd done.
Not every DAW will let you drag a MIDI clip onto a plugin's window — so for those, BassMuse can read your chords as you actually play them instead.
The drum channel (10) is ignored during capture, for the same reason it's ignored everywhere else — so a kick pattern arriving on the same input never gets mistaken for a chord tone. BassMuse still asks before replacing chords that are already there, exactly as it does for a dropped clip.
Everything BassMuse saves is plain text. There's no proprietary pack format, no samples riding along, and nothing to recompile — a style, a song, or a whole bundle is just a text file you can open, read, email, or drop into a chat. That's a deliberate choice: it means sharing your work is exactly as easy as sharing any other document.
There are three file types, and each one exists for a different-sized job:
| File | Contains | Save / load with |
|---|---|---|
.bmstyle | One style | Import Style / Export Style |
.bmsong | A whole arrangement — sections, meters, chords, styles referenced by id | File ▸ Save / Load Song |
.bmbundle | A song plus every style it uses — fully self-contained | File ▸ Save / Load Bundle |
File ▸ Load Song doesn't just open BassMuse's own song files — it also opens the song files from PianoMuse and RhythmMuse. The arrangement transfers completely: sections, chords, time signatures, per-bar fills, and mutes all come across, and BassMuse applies its own styles to it, since every Muse plugin shares one underlying song format. Practically, that means a song built in one plugin is never locked out of another — an arrangement you wrote for one instrument can become the basis for a part on another, without retyping a single chord.
When you have more than one Muse plugin open in the same session — say a bass part on one track and a piano part on another — BassMuse can pull an arrangement straight from a neighbour, with no file in between. Open File ▸ Copy arrangement from a running plugin and pick any other Muse instance that's currently loaded; its current arrangement is copied into BassMuse on the spot.
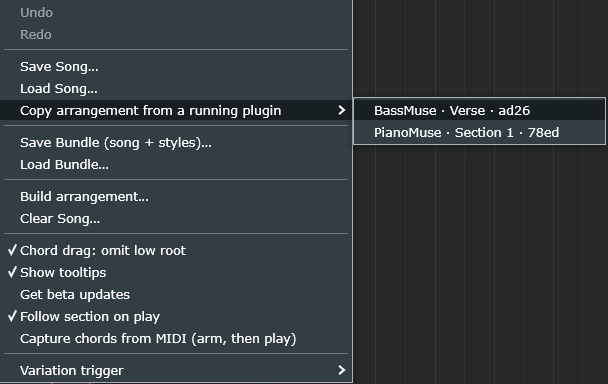
Figure 13.1 Each running Muse plugin lists the others by product, section name and a short id — pick one and its arrangement is copied in.
It's the same transfer as opening another product's song file: sections, chords, meters, per-bar fills and mutes all come across, BassMuse applies its own styles, and the note range is reset to suit this instrument. The copy is a one-time snapshot, not a live link — edit it freely afterwards without touching the plugin you copied from. Each instance keeps its neighbours posted every few seconds, so the list always reflects what's open right now.
BassMuse treats styles and songs differently, and it's worth knowing why:
Documents/BassMuse/Styles/*.bmstyle. BassMuse scans this folder once, at startup, and adds anything it finds to the Style dropdown automatically — so a style someone shares with you only needs to land in that one folder to show up ready to use.Documents/BassMuse/Songs/*.bmsong, but that's only ever a starting suggestion in the file dialog — you can save a song anywhere you like. Songs aren't scanned or auto-loaded the way styles are; you always load one explicitly..bmsong file small and easy to share. If you send someone a song and they're missing one of its custom styles, that section simply falls back to the first style in their list; the chords, meter, and feel are completely unaffected, so the song still plays, just possibly with a different voice on that section than you intended. Send a bundle instead whenever you want to guarantee they get everything, in one file, with nothing missing.A .bmstyle file is a small, hand-editable text format: key = value lines, with # starting a comment. A rhythm figure is written as cell = <onset ...> | <weight>, and a bar's accent pattern as accent = a b c d. Between those lines, you control a style's register, its swing, the weights behind its note choices, its velocity and articulation, and its overall feel — everything that makes one style sound different from another. The Appendix has the full key list if you want to build one from scratch, or just want to understand what a line in someone else's style file is actually doing.
BassMuse's Follow-MIDI code never changes from one DAW to the next — it just reads note-on and note-off from whatever MIDI arrives at its input, the same way in Reaper as in Cubase. What does change, DAW by DAW, is routing: how each host actually lets a MIDI-generating plugin sit between your chords and an instrument. Once you know which of three patterns your DAW uses, the rest is just mechanics.
| DAW | Format | Model | Routing in a nutshell |
|---|---|---|---|
| Reaper | VST3 / AU | A | BassMuse, then the instrument, in one track's FX chain |
| Bitwig | VST3 | A | BassMuse before the instrument in the device chain |
| Logic Pro | AU | A | BassMuse in the track's MIDI FX slot |
| Mixbus 11 | VST3 / AU | A | BassMuse then the instrument in the processor box |
| FL Studio 2024 | VST3 | A | Wire chords → BassMuse → synth inside Patcher |
| Waveform 14 (Tracktion) | VST3 / AU | A | BassMuse then the instrument in one track's plugin chain |
| Cubase 15 | VST3 | B | Instrument + MIDI-out route (no VST3 MIDI-insert) |
| Cakewalk Sonar | VST3 | B | Enable plugin MIDI-out, MIDI track → instrument |
| Studio One 7 | VST3 | B | Track B Instrument Input = BassMuse ⚠ real-time export |
| Fender Studio Pro 8 | VST3 | B | Track B Instrument Input = BassMuse ⚠ real-time export |
| Digital Performer | VST3 / AU | B | BassMuse instrument → MIDI out to a 2nd instrument track |
| UAD Luna Pro | AU | B | Instrument track MIDI-out → instrument track |
| Pro Tools | AAX ✗ | C | Import the .mid, or a VST→AAX bridge (Chapter 15) |
Routing is worth learning, but sometimes you just want to hear what BassMuse came up with — right now, before you've wired an instrument to it at all. That's what Preview is for. You'll find it just to the right of the range controls: a Preview button, and beside it a small level slider.

Figure 14.1 The Preview control, just to the right of the range controls: the Preview button and its level slider.
Arm Preview and press Play in your DAW. BassMuse auditions the generated part through a built-in sound, locked to the transport exactly as the finished part would be — so what you hear is the real timing and feel, not an approximation. While Preview is on, the MIDI that would normally drive your routed instrument is held back, so you hear the built-in sound on its own rather than both at once. Switch Preview off and BassMuse goes straight back to driving your own instrument, untouched — nothing about your routing changes. Preview just borrows the output for a moment so you can listen. Because it follows the transport, you won't hear anything until you press Play; that's by design, so a preview never plays over the top of a stopped session.
Preview folder). Preview is only ever a quick audition aid; the sound you'll actually keep comes from the instrument you route to, or from the MIDI you drag out (Chapter 12).Waveform runs a left-to-right plugin chain on every track and passes MIDI straight down it, so BassMuse and the instrument can live on one track together (Model A). The signal path is simply chords → BassMuse → instrument.
Or skip the routing altogether: drag BassMuse's part straight onto the instrument's track with Drag-MIDI (Chapter 12) and press Play. It's the simplest path in this host, same as everywhere else.
Cubase treats BassMuse as an instrument, never a MIDI insert, so BassMuse and the real instrument live on separate tracks — BassMuse generates the MIDI, and the instrument on a second track turns it into sound. The one thing to know going in is that no amount of rescanning will make BassMuse appear in a track's MIDI-insert slots (see the note above); load it in the rack instead and the routing falls into place.
Cubase is the one host where the Chord Track pays off directly: it emits real MIDI into BassMuse's Follow input, so a progression on the Chord Track drives the part with nothing else to wire. And, as everywhere, you can skip the routing altogether — drag BassMuse's part straight onto the instrument's track with Drag-MIDI (Chapter 12) and press Play.
Fender Studio Pro is built on Studio One, so the two route BassMuse the same way, and these steps cover both. Like Cubase, they treat BassMuse as an instrument, not a MIDI insert — so BassMuse and the real instrument live on separate Instrument tracks. The trick that makes it click is Studio One's Instrument Input: an instrument track can take its MIDI from another instrument, so you point your real instrument's input at BassMuse and it plays whatever BassMuse generates.
In Cakewalk, BassMuse and the instrument are always two separate tracks — BassMuse emits MIDI, and the instrument is what actually makes sound.
Or, once again, skip the routing entirely: drag BassMuse's MIDI straight onto the instrument's track (not BassMuse's own) with Drag-MIDI, and press Play.
Pro Tools speaks AAX only, and BassMuse doesn't have an AAX build yet — so it won't show up in Pro Tools' plugin list the way it would in almost any other DAW. That's not a bug to work around so much as a genuine gap, and I'd rather tell you that plainly than pretend otherwise. The good news is there are two workflows that cover Pro Tools today, and one of them needs nothing beyond BassMuse itself.
This is the most reliable path, and it doesn't cost you anything beyond what you already own.
.mid file of your part. Drag-MIDI (Chapter 12) or a plain Save both work, from BassMuse running in any other DAW you own.Because this path never touches BassMuse at playback time, it's the one I'd reach for first: there's simply nothing to go wrong at mixdown.
If you'd rather have BassMuse actually running live inside Pro Tools — following chords in real time rather than working from a pre-rendered file — a bridge plugin makes that possible, at the cost of needing to own one.
A native AAX build — one that would show up directly in Pro Tools' own plugin list, no bridge required — is technically feasible, and the groundwork for it already exists in the build system. It isn't scheduled for a specific release, though: it depends on enrolling in Avid's developer and PACE signing programs, which is more of a standalone project than a feature flag, and it's being held for when there's clear demand from Pro Tools users rather than built speculatively. Until then, the two paths above are the whole story for Pro Tools, on both products.
Most problems with BassMuse trace back to one of a handful of causes, and once you know the short list, a symptom that looked mysterious usually turns out to be a one-line fix. Here's the table to check first, followed by how to reach us for anything it doesn't cover.
| Symptom | Fix |
|---|---|
| Plugin doesn't appear | Rescan plug-ins in your DAW. Confirm it actually installed to the system VST3 / Components folder (Chapter 2). On Mac, Logic and Luna specifically need the AU build, not the VST3. |
| No sound | BassMuse makes no audio of its own — its MIDI has to reach an instrument somewhere in your chain. Check the routing pattern for your DAW (Chapter 14). |
| Part doesn't move / nothing plays | In Song mode, make sure you've actually got chords in the grid. In Follow mode, confirm chords are really arriving at BassMuse's MIDI input — not just sent from your DAW, but landing on the right track. |
| Not in time | BassMuse locks to your host's transport, not its own clock — press Play in the DAW itself, and check that Host BPM reads your actual tempo. |
| Drum-lock does nothing | Send kick MIDI on channel 10 (notes 35 or 36) into BassMuse, then raise the Drum slider (Chapter 11). Audio drums won't drive it — it only reacts to MIDI. |
| Bounce is silent or late (Studio One, Fender Studio Pro) | Export with Real-Time Processing turned on, or sidestep it entirely with Drag-MIDI (Chapter 12). |
| SmartScreen / Gatekeeper prompt | Release builds are code-signed, so this is a reputation check, not a sign anything's wrong — a brand-new release can still trip Windows' "not commonly downloaded" warning until it builds up a track record (More info → Run anyway), or need a first-time right-click → Open on macOS. See Chapter 2. |
| Shared song is missing a style | That section quietly falls back to the first style in the list rather than breaking. Ask whoever sent it for a bundle instead (Chapter 13) — a bundle carries every style it needs, so nothing has to fall back. |
Click Report in the plugin header to open a short form, right there in the plugin — no need to leave your DAW or dig up your version number. It asks for a type (Bug, Idea, or Question), a short title, and what happened, and it automatically attaches your BassMuse version, your operating system, and the host you're running in, so you never have to type any of that yourself. If you'd rather not use the in-plugin form, the feedback page does the same job from a browser. Either way, it lands on the same feedback board, where other owners can see it and upvote it.
This chapter is the reference material everything else in the manual points back to — file locations, the complete dial-by-dial breakdown of a style file, and the chord vocabulary BassMuse reads. You won't read it start to finish so much as land on the one row you actually need.
| Item | Path |
|---|---|
| VST3 (Windows) | C:\Program Files\Common Files\VST3\BassMuse.vst3 |
| VST3 (macOS) | /Library/Audio/Plug-Ins/VST3/BassMuse.vst3 |
| AU (macOS) | /Library/Audio/Plug-Ins/Components/BassMuse.component |
| User styles | Documents/BassMuse/Styles/*.bmstyle |
| User songs | Documents/BassMuse/Songs/*.bmsong |
.bmstyle keys — the full dial referenceEvery dial a style can set, with its range and built-in default. Ten of them are live controls in the plugin — the nine knobs Density, Complexity, Swing, Humanize, Ghost, Legato, Flow, Fill, and Anchor, plus the Fill direction picker (all marked ●) — and the rest are set only in the .bmstyle file itself. Export Style writes all of them, so exporting any built-in bassist gives you a complete, editable template to start from rather than a blank page. Unknown keys are simply ignored on import, which is what keeps the format forward-compatible as new keys get added.
| Key | Range · default | What it does | |
|---|---|---|---|
| Identity | |||
id | text | Unique id a song uses to reference the style | |
name | text | Label shown in the Style dropdown | |
| Register (MIDI note numbers) | |||
centerPitch | 0–127 · 60 | Home register the line gravitates to | |
lowPitch | 0–127 · 36 | Lowest note allowed | |
highPitch | 0–127 · 88 | Highest note allowed | |
| Rhythm & density | |||
density ● | 0–1.5 · 1.0 | Baseline busyness (also the Density knob) | |
swing ● | 0–0.5 · 0 | Delays the off-beat within a beat (also the Swing knob) | |
restProb | 0–1 · 0.05 | Chance any non-anchor onset is dropped (space) | |
ghostProb ● | 0–1 · 0 | Chance a note becomes a quiet ghost note (the Ghost knob) | |
| `cell = | repeatable | One-beat rhythm figure + relative likelihood (see below) | |
| Feel (loaded into the knobs when the style is picked) | |||
complexity ● | 0–1 · 0.5 | Chromaticism / walking / approach motion (Complexity knob) | |
humanize ● | 0–1 · 0.6 | Overall timing + velocity looseness (Humanize knob) | |
flow ● | 0–1 · 0.0 | Note connectedness — ties notes toward the next attack across empty beats, stopping at chord changes (the Flow knob) | |
fill ● | 0–1 · 0.0 | Transition fill — a directional run into the section's last bar, landing on the approach to the next chord; length and busyness grow with the value (the Fill knob). Per-bar right-click markers override it. | |
fillDir ● | 0/1/2 · 0 | Fill run direction: 0 = Auto (toward the next chord), 1 = Up (always ascend), 2 = Down (always descend). The per-section Fill direction picker; per-bar markers can override it. | |
| Note-choice weights (relative; the "which note" brain) | |||
wRoot | ≥0 · 3.0 | Pull toward the chord root | |
wFifth | ≥0 · 1.5 | Pull toward the fifth | |
wOctave | ≥0 · 1.0 | Pull toward the octave | |
wThird | ≥0 · 0.8 | Pull toward the third | |
wSeventh | ≥0 · 0.6 | Pull toward the seventh | |
wApproach | ≥0 · 1.0 | Chromatic/scale approach into the next chord | |
wChromatic | ≥0 · 0.4 | Chromatic passing tone off the previous note | |
wScaleWalk | ≥0 · 0.8 | Step through the chord scale (walking) | |
rootAnchor | 0–1 · 0.6 | The style's own baseline pull toward locking a chord's downbeat on the root. This is what the Anchor knob (Chapter 6) falls back to while it's left on Auto: the effective anchor strength is rootAnchor × (1 − 0.5 × Complexity), so a busier, more complex passage naturally loosens its grip on the root even before you touch the Anchor knob yourself. Every built-in style tunes this individually — Jazz sits low at 0.22 (walks freely), Hard-Rock and Sustained sit high at 0.85 (locked to the root). | |
octaveJumpProb | 0–1 · 0.10 | Chance of leaping an octave | |
approachOnChangeProb | 0–1 · 0.50 | Chance of aiming at the next root on a chord change | |
| Articulation | |||
baseVelocity | 1–127 · 92 | Loudness center | |
velRange | ≥0 · 14 | ± velocity humanisation | |
accent = a b c d | per beat · 6 0 2 0 | Velocity added on each beat of the bar | |
staccato ● | 0–1 · 0.80 | Note length within the beat, as a fraction of its slot (the Legato knob) | |
| Micro-timing | |||
timingJitter | beats · 0.010 | Random timing spread per note | |
behindBeat | beats · 0.000 | Constant push; positive = laid back, negative = on top | |
Each cell is one beat wide; onsets are fractions of the beat in [0,1), and the weight after | is its relative likelihood:
cell = 0                | 1     # a quarter note
cell = 0 0.5            | 3     # two eighths, weight 3
cell = 0 0.25 0.5 0.75  | 2     # four sixteenths
cell = 0.5 0.75         | 1.5   # off-beat figure
cell =                  | 1     # a whole-beat rest (space)
Roots A–G with #/b; qualities including m, 7, maj7, m7, m7b5, dim, aug, sus2/sus4; extensions 9/11/13; slash bass like C/E. In a plain-text song file, a chord can be positioned within its bar as SYM@beat — for example, G@2.
BassMuse v1.20.1 · VST3, Audio Unit & CLAP · Windows & macOS. Styles model stylistic characteristics, not copyrighted transcriptions of any specific recording or performer.